Hikvision · Intercoms
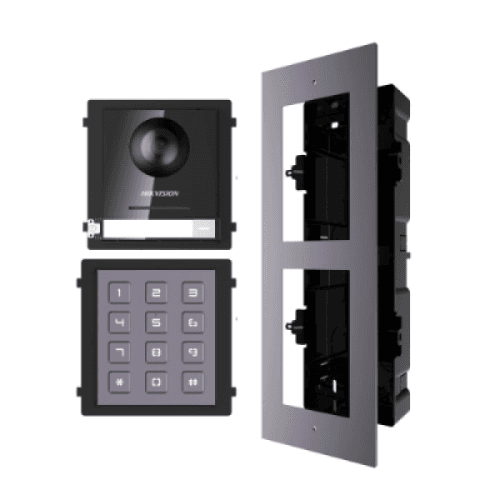
Hikvision 2nd Gen IP Intercom Kit, Door Station, Keypad Module & Flush Gang Box
Model / SKU: HK-INT-GEN2-KIT1
Door station · Intercom kit · IP intercom
$535.00incl. GSTShowroom availability to be confirmedView product ↗ RHODIUMSECURITY Your cart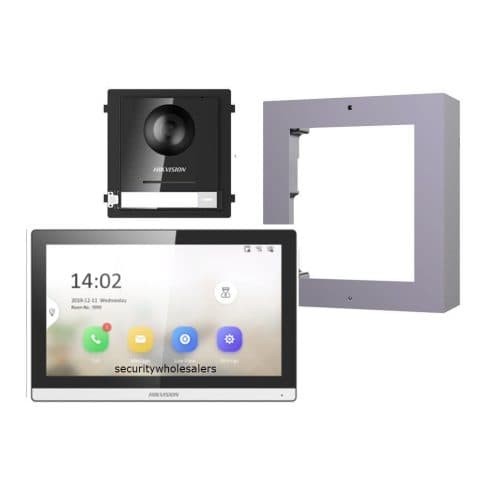
Product image. Check the selected model, lens, colour and package contents before ordering.
Hikvision · Intercoms
Model / SKU: HIK_INTERCOM-GEN2-KIT-SURFACE
Hikvision Gen2 IP Modular Intercom Kit for Homes (Surface Mount). This kit consists of the most commonly ordered items (to make it easier for you) 1 x Hikvision 2nd Gen DS-KD8003-IME1 IP Intercom, Door Station with Camera, 1x Button, IP65, 12VDC/POE 1 x Hikvision 2nd Gen. DS-KD-ACW1 Intercom, Door Station Housing, Surface Mount, Supports 1 Module 1 x Hikvision 2nd Gen Hikvision DS-KH6350-WTE1 Gen2 IP Intercom, 7″ Touch Screen Room Station, 1024 x 600, 12VDC/POE (this is the latest model) This kit consists of the most commonly ordered items (to make it easier for you) 1 x Hikvision 2nd Gen DS-KD8003-IME1 IP Intercom, Door Station with Camera, 1x Button, IP65, 12VDC/POE 1 x Hikvision 2nd Gen. DS-KD-ACW1 Intercom, Door Station Housing, Surface Mount, Supports 1 Module 1 x Hikvision 2nd Gen Hikvision DS-KH6350-WTE1 Gen2 IP Intercom, 7″ Touch Screen Room Station, 1024 x 600, 12VDC/POE (this is the latest model) WIRING REQUIREMENTS; > ethernet cable from Door Station to Poe Switch > ethernet cable from the indoor Monitor to Poe Switch > ethernet cable Poe Switch to the modem (if you wish to set up remote communication) If you need to open/ control 1-2 door / gate strikes, run 4 core cabling from the Intercom Door Station to the respective strikes. These strikes need to be powered separately, ie. the door station will not be able to power these strikes. Image Name Price Buy hf:att:pa_ai-technology hf:att:pa_audio-features hf:att:pa_camera-count hf:att:pa_camera-style hf:att:pa_detection-features hf:att:pa_deterrence-features hf:att:pa_environmental-features hf:att:pa_focal-length hf:att:pa_hdd-bays hf:att:pa_hdd-included hf:att:pa_ik-rating hf:att:pa_included-storage hf:att:pa_installation-level hf:att:pa_ip-rating hf:att:pa_kit-camera-style hf:att:pa_lens-type hf:att:pa_low-light-technology hf:att:pa_max-recording-resolution hf:att:pa_mounting-position hf:att:pa_night-vision-range hf:att:pa_night-vision-type hf:att:pa_optical-zoom hf:att:pa_poe-ports hf:att:pa_power-connectivity hf:att:pa_protocol-compatibility hf:att:pa_recorder-channels hf:att:pa_remote-viewing hf:att:pa_resolution hf:att:pa_specialist-features hf:att:pa_system-format hf:att:pa_white-light-range hf:att:pa_zoom-type Hikvision DS-3E1105P-EI 4 Port Smart POE Switch $ 64.00 inc GST +3 Year Warranty & Support Hikvision DS-KH6320-TE1 Gen2 Video Intercom 7-Inch Touch Screen Indoor Room Station $ 246.00 inc GST +3 Year Warranty & Support Hikvision DS-3E0310HP-E 8 Port Fast Ethernet Unmanaged POE Switch $ 160.00 $ 260.00 inc GST +3 Year Warranty & Support Hikvision DS-KH6350-WTE1 Gen2 IP-Based 7 inch Indoor Intercom Station Wifi $ 189.00 $ 194.00 inc GST +3 Year Warranty & Support Hikvision DS-KH6350-WTE1 Gen2 IP-Based 7 inch Indoor Intercom Station Wifi WHITE $ 195.00 inc GST +3 Year Warranty & Support Hikvision Gen2 DS-KD8003-IME1 Video Intercom Module Door Station (Surface Mount) $ 220.00 $ 300.00 inc GST +3 Year Warranty & Support Hikvision Gen2 DS-KD8003-IME1/Flush Video Intercom Module Door Station (Flush Mount) $ 301.00 inc GST +3 Year Warranty & Support Hikvision DS-KABH6350-T Table Bracket for Indoor Intercom Monitors $ 29.00 inc GST +3 Year Warranty & Support DOOR STATION The Hikvision 2nd Generation offers a flexible modular range of IP intercoms. The HIK-KD8003-IME1 is a door station with a 2MP HD camera which supports up to 8 extension modules. Being a modular and customisable design, this allows the SI to create an entry door panel consisting of one or all the following options; electronic tenant directory, digital keypad, nametag, RFID reader and display modules. IP65 rating H.264 video compression -40 to +60 degrees Celsius operating temperature Dimensions: 98 x 99.8 x 43.9mm 2MP HD video intercom function Access control function Noise suppression and echo cancellation Low illumination Tampering alarm supported Fisheye camera with IR supplement light Supports up to 8 sub-modules’ Nametag customisation Easy to expand SURFACE MOUNT MODULE The Hikvision HIK-KD-ACW1 is a surface mount door station housing that is designed to support 1 module. Material: aviation aluminium Operating temperature: -40 to 60 degrees celsius Frame dimensions: 117 x 107 x 32.7mm Cover dimensions: 117 x 107 x 4mm MONITOR Hikvision DS-KH6350-WTE1 Gen2 IP-Based 7 inch Indoor Intercom Station Wifi 7 inch touch screen 1024 x 600 resolution Standard PoE 128MB memory Up to 32GB micro SD slot for memory expansion Built-in omnidirectional microphone & loudspeaker Messages and captured pictures stored in the TF card Remote unlocking via the client software or the mobile client Views live videos of door stations and linked cameras -10 to +55 degrees Celsius operating temperature Dimensions: 200 x 140 x 15.1mm .ewd-ufaq-post-margin-symbol { } .ewd-ufaq-post-margin-symbol span { } .ufaq-faq-display-style-Block.ewd-ufaq-post-active, .ufaq-faq-display-style-Block.ewd-ufaq-post-active a,.ufaq-faq-display-style-Block:hover, .ufaq-faq-display-style-Block:hover a, .ufaq-faq-display-style-Block:hover h4 { } .ufaq-faq-display-style-Border_Block.ewd-ufaq-post-active, .ufaq-faq-display-style-Border_Block:hover, .ufaq-faq-display-style-Border_Block:hover h1, .ufaq-faq-display-style-Border_Block:hover h2, .ufaq-faq-display-style-Border_Block:hover h3, .ufaq-faq-display-style-Border_Block:hover h4, .ufaq-faq-display-style-Border_Block:hover h5, .ufaq-faq-display-style-Border_Block:hover h6 { } .ufaq-faq-display-style-Border_Block .ufaq-faq-body { } .ufaq-faq-display-style-Border_Block .comment-reply-title, .ufaq-faq-display-style-Border_Block:hover .comment-reply-title { background-color: transparent !important;} div.ufaq-faq-category-title h4 h4 { } .ufaq-faq-header-title a{ } div.ufaq-faq-title h4 { } .ewd-ufaq-post-margin-symbol { } div.ufaq-faq-post p { } div.ufaq-faq-body, .ufaq-faq-display-style-Border_Block .ufaq-faq-body { } div.ewd-ufaq-author-date { } div.ufaq-faq-categories, div.ufaq-faq-tags { } var faq_accordion = false;var faq_scroll = true;var reveal_effect = ‘none’; Intercom (14) a How do I get Firmware Updates for my Hikvision Gear? Hikvision Australia’s website has firmware updates for available IP cameras. https://www.hikvision.com/au-en/ Use the search bar to try and find your product. Firmware updates are usually available on the product page. IF YOU BOUGHT EQUIPMENT FROM US: You will need to contact us if you can’t find your camera listed or if you require firmware for your NVR / DVR. You will need to also provide the full serial number of the device as well as your current firmware. This is to ensure upgrades are done properly. In some instances middlle firmware is required before upgrading to the latest version. We do not recommend doing intercom firmware upgrades. Please check with us if there is any doubt. If you didn’t buy equipment from us, please contact the people who you bought the equipment from. Permalink a How to Set up & Configure Hikvision IP Intercom system This is a comprehensive guide with lots of videos providing guidance for setting up Hikvision IP Intercoms. Cabling requirements: > ethernet cable from every Door Station to Poe Switch > ethernet cable from every indoor Monitor to Poe Switch > ethernet cable from Poe Switch to the modem (if you wish to set up remote communication) Need to unlock a gate? If you need to open/ control 1-2 door / gate strikes, run 4 core cabling from the Intercom Door Station to the respective strikes. These strikes need to be powered separately, ie. the door station will not be able to power these strikes. GEN 2 Guides Watch the below video to get cracking. ONE DOOR STATION AND ONE MONITOR – in case the first video was too fast. Set up is quick and easy and doesn’t use IVMS4200. INTRODUCTION VIDEO + HOT TIPS OR ONE DOOR STATION AND ONE MONITOR IVMS4200 Method: If you need the indoor monitor to connect through wifi instead of data cable – https://www.youtube.com/watch?v=TklIto_nVh8 How to add more monitors (requires a PC running IVMS4200) How to add keypad: How to add maglock? How to add exit button? How to add more door stations: ——————– THE MOST USEFUL GUIDES FROM HIKVISION HOW TO CONFIGURE DOOR STATION AND EXTENSION VIA LOCAL INTERFACE HOW TO ADD A SINGLE INDOOR STATION TO THE DOOR STATION HOW TO SET UP INDOOR EXTENSION ON IVMS4200 ————— Indoor Station Configuration Guide Indoor Station Operation Guide Indoor Station Quick Start Guide Probably the most useful guide ever *** CLICK HERE *** How to setup – guide from Pipl Systems – https://pipl.systems/setup-tutorial-hikvision-2nd-modular-intercom-system/ Add a second monitor – https://www.youtube.com/watch?v=-11RJ1S-8Xg How to add a single sub-door station to the main door station GEN 1 Guides Please click to download. How to set up HIKVISION intercom for first time How to configure a Hikvision Villa Intercom System How_to_configure_HIK_intercom(Villa_system).pdf Hikvision Intercom add to Hik Connect Permalink a How to Configure Gen2 Hikvision Intercom Most common system – 1 door station – 1 monitor: 1. Follow the setup via the indoor monitor. No need to even load IVMS4200. 2 Scan the QR code via Hik Connect app to setup remote viewing System with 1 door station, 1 main room and multiple sub room stations 1.Set up the first unit using the main room monitor 2. Add the subroom monitors using IVMS4200. (the IP addresses are examples only) Apartment system Configure as above with IVMS4200. IP addresses are samples System with multiple door stations Configure as above with IVMS4200. IP addresses are samples Some helpful hints HIK CONNECT Only Master room stations should be added to Hik-Connect. Issues may occur if a Sub station is added. The app can be found on the iOS and Android app stores. Gen2IntercomGeneral-Rules Download Permalink a How to set time on Hikvision door station Get the IP Address of the door station via HIkvision SADP tool 2. Download Hikvision IVMS4200 – https://www.hikvision.com/en/support/download/software/ivms4200-series/ (just download the first / basic one) 3. Add the device to IVMS4200 using the IP address – ensure you choose Synchronise time. Click Add Thats it! Permalink a Set Password On Hikvision Gen2 Intercom Keypad Permalink a How to configure Hikvision Apartment intercom system This tech guide from Hikvision helps you configure a Hikvision apartment intercom system. https://www.hikvision.com/mtsc/uploads/Ckeditor/Files/2018-10-03/How_to_configure_HIK_intercom(Apartment_system).pdf Permalink a What is Hikvision SADP Tool? Where can I download? SADP stands for search active device protocol, it’s Hikvision’s free and simple utility for searching Hikvision products (including IP cameras and DVRs/NVRs) in the local network. Its commonly used for: resetting password Finding out what firmware is currently used changing IP addresses SADP TOOL FOR WINDOWS – https://www.hikvision.com/au-en/support/tools/hitools/ – Permalink a Can you add Hikvision CCTV cameras to a Hikvision Intercom monitor? Yes. Hikvision CCTV cameras can be added to an indoor station thus allowing remote viewing directly from the indoor station for added security. A typical Hikvision room station can have up to 16 cameras viewable – one at a time. For a guide as to how to set this up, please see attached: Gen1 Intercom – Tech_Note_Adding_IP_Cameras_to_To_Room_Station Gen2 Intercom instructions below: Step 1- Get SADP tool to get the IP address of the NVR. Step 2 – use IVMS4200, add the room station to IVMS. Then add as per screenshot below: Otherwise via Intercom monitor: Settings > 2 Icons on right (Configuration) > 3rd icon (device management) , Click on + sign and enter IP address. Port 554. username / password is the details of the camera. Permalink a How can I Connect an IP Intercom door station to NVR so that it records? These tech notes should assist you with this requirement. https://pipl.systems/making-ip-network-door-phone-doorbell-record-video-to-the-nvr-hikvision-dahua-universal-guide/Connecting IP Intercom to NVR Permalink a Can I communicate between Hikvision intercom monitors? Yes. In an Intercom system with 2 or more indoor stations, each station can dial or call between each other by using the following dialing format. 0- (Main indoor unit is typically 0 and other extension units are 1 thru 5) For Example: To call the Main indoor station from any indoor station you would dial 0-0 To call the first indoor extension from any indoor station, included the main indoor station, you would dial 0-1 Permalink a How do you connect a Hikvision IP Intercom to a strike? Please refer to page 5 of the user manual. https://www.securitywholesalers.com.au/wp-content/uploads/2020/07/DS-KD8003-IME2-Installation-Guide.pdf Page 8 onwards may also help https://www.hikvision.com/content/dam/hikvision/products/S000000001/S000000083/S000000129/S000000131/OFR002104/M000001550/User_Manual/UD20209B_Baseline_Video-Intercom-Module-Door-Station_User-Manual_V2.2.3.PDF Most residential customers would use the Green and Blue cable The Power would depend on the electric strike (to be powered separately). Further, the strike also has NO and NC setting. So, the strike has to also be on NO setting For commerical sites, some of them may use NC, so in that case, we still use electric strike but use the pink, NC cable to connect to it Permalink a Dahua IP intercom configuration guide? https://www.securitywholesalers.com.au/wp-content/uploads/2019/11/Dahua-Villa-Intercom-1-VTHx1VTO.pdf Sure, you’ll find this below: Permalink a How to configure an indoor and outdoor intercom station via Wifi only Permalink a Hikvision DS-KV6124-WBE1 Setup Guide The DS-KV6124-WBE1 is a Hikvision 6-Series villa door station with 4MP video , 150° viewing angle , Wi-Fi , PoE / 12V DC power , 2 lock outputs , and unlocking by PIN, card, Bluetooth, Hik-Connect app, indoor station, or relay unlock . 1. What you need You will usually need: Item Purpose DS-KV6124-WBE1 door station Front door / gate intercom 12V DC power supply or PoE switch Powers the unit Network cable For setup / PoE / LAN connection Hik-Connect app Mobile app setup iVMS-4200 or SADP Tool Activation and configuration Electric strike / maglock / gate input For unlock function Optional indoor monitor For local answering inside the house The unit supports PoE or 12V DC . If using Wi-Fi, you still need to power the unit with 12V DC or PoE during setup. 2. Mounting height Recommended mounting height is generally 1.4m to 1.6m from ground level to camera height . Hikvision’s quick-start material shows this range for the 6-Series villa stations and notes the 150° horizontal view angle. Best practical height: 1.5m from finished floor level is usually ideal. Avoid mounting: Too low, where faces are cut off. Too high, where you only see the top of people’s heads. Facing direct afternoon sun. Where rain can run down the wall into the cable entry. Use silicone around the cable entry area to reduce water ingress, as Hikvision’s installation material specifically recommends sealing the wiring area. 3. Power and network options Option A — Best method: PoE Use a PoE switch. Wiring: Router / Network Switch | PoE Switch | DS-KV6124-WBE1 This is the cleanest method because one CAT6 cable provides both data and power. Option B — 12V DC + Wi-Fi Use this where no network cable is available. 12V DC power supply → DS-KV6124-WBE1 Wi-Fi router → Wireless connection This is convenient, but for gates and front doors, wired PoE is still more stable. 4. First activation Method 1 — Using SADP Tool Connect the DS-KV6124-WBE1 to the same network as your computer. Open SADP Tool . Find the device in the list. It will likely show as Inactive . Tick the device. Create an admin password. Activate the device. Set the IP address. Example: Router IP: 192.168.1.1 Door station: 192.168.1.64 Subnet mask: 255.255.255.0 Gateway: 192.168.1.1 DNS: 8.8.8.8 or router IP Method 2 — Using iVMS-4200 Open iVMS-4200 . Go to Device Management . Look under Online Devices . Select the DS-KV6124-WBE1. Click Activate . Set password. Modify network settings. 5. Basic web login Once activated: Open a browser. Go to: http://DEVICE-IP Example: http://192.168.1.64 Login with the admin password. Check: Network settings Time settings Video settings Intercom settings Unlock settings Wi-Fi settings if needed 6. Wi-Fi setup If using Wi-Fi: Login to the door station. Go to Network . Find Wi-Fi settings. Scan for Wi-Fi. Select the customer’s Wi-Fi network. Enter Wi-Fi password. Save. Confirm the unit receives a valid Wi-Fi IP address. Disconnect Ethernet only after Wi-Fi is confirmed working. Important: make sure the Wi-Fi signal is strong at the front door or gate. If signal is weak, use PoE or install an outdoor access point. 7. Add to Hik-Connect app Open Hik-Connect . Login to the customer’s account. Tap + . Scan the QR code on the device or add by serial number. Enable Hik-Connect on the door station if needed. Enter the verification code. Add the device. On the door station, make sure: Platform Access / Hik-Connect: Enabled Status: Online If it says Offline , check: Gateway is correct. DNS is correct. Internet is working. Device time is correct. Router is not blocking it. 8. Relay / unlock wiring The DS-KV6124-WBE1 supports 2 lock controls . Hikvision lists this model as supporting two locks and multiple unlocking methods including PIN, card, Bluetooth, Hik-Connect and indoor station unlock. Typical relay terminals will be similar to: COM NO NC For electric strike — fail secure Most electric strikes use NO + COM . Power Supply + | Strike + Strike - | Relay NO Relay COM | Power Supply - When the relay triggers, the circuit closes and the strike unlocks. For magnetic lock — fail safe Most maglocks use NC + COM . Power Supply + | Maglock + Maglock - | Relay NC Relay COM | Power Supply - When the relay triggers, it breaks power and the maglock releases. For gate motor trigger Most gate motors only need a dry contact input. Use: COM + NO Wire those into the gate controller’s push button / open input terminals. Do not send 12V into a gate input unless the gate manual specifically says to. Most gate inputs only want a momentary dry contact. 9. Configure unlock settings In the device settings, check: Access Control / Relay / Door Lock Set: Relay 1: Main door / gate Unlock duration: 1 to 3 seconds for gate trigger Unlock duration: 3 to 5 seconds for electric strike Relay 2: Optional second lock For a gate motor, usually use: Unlock duration: 1 second For an electric strike: Unlock duration: 3 to 5 seconds For a maglock: Unlock duration: 5 seconds 10. Adding an indoor station If using a Hikvision indoor monitor: Activate the indoor station. Put it on the same network. Set indoor station room number, commonly: Room No: 101 In the door station, set call destination to the indoor station. In iVMS-4200, add both devices. Link the door station to the indoor station. Press the call button and test. Typical setup: Door Station: 192.168.1.64 Indoor Station: 192.168.1.65 Room Number: 101 When someone presses the door station button, the indoor monitor should ring. 11. Adding to an NVR You may also add the DS-KV6124-WBE1 to a Hikvision NVR as an IP camera stream. On the NVR: Go to Camera Management . Add IP camera manually. Enter: IP address Username: admin Password Protocol: Hikvision Port: usually 8000 Save. Confirm video appears. This records the video stream, but it does not always give full intercom control from the NVR interface. Use Hik-Connect or indoor station for proper answering/unlocking. 12. Card / PIN / Bluetooth unlocking The DS-KV6124-WBE1 supports multiple unlocking methods including card, PIN code, Bluetooth, Hik-Connect, and indoor station unlocking . In the web interface or iVMS-4200: Go to Person / Access Control / User Management . Add user. Assign: PIN code Card number Bluetooth credential if supported in your firmware/app workflow Assign permission to Relay 1 or Relay 2. Test unlock. 13. Recommended basic settings Use these as a practical default: Device IP: Static Time zone: Australia/Sydney NTP: Enabled Hik-Connect: Enabled Video resolution: Main stream 4MP Audio: Enabled Echo cancellation: Enabled Relay 1: Gate / front door Unlock time: 1–5 seconds depending on lock type Call destination: Hik-Connect and/or indoor station 14. Testing checklist After setup, test these one by one: Test Expected result Press call button Phone or indoor station rings Answer call Two-way audio works Unlock from app Relay clicks / gate opens PIN unlock Relay triggers Card unlock Relay triggers Night image Face is visible Wi-Fi signal Stable if using Wi-Fi Reboot test Device comes back online Rain exposure Cable entry sealed 15. Common problems Problem: Device not showing in SADP Check: Laptop is on same network. Firewall is not blocking SADP. Network cable is working. PoE switch is powering the unit. Try direct connection to same switch. Problem: Hik-Connect says offline Check: Gateway DNS Internet access Platform Access enabled Verification code Device time Use DNS: 8.8.8.8 1.1.1.1 Problem: Call button does not ring phone Check: Hik-Connect is online. Push notifications allowed on phone. Device is shared to the correct Hik-Connect account. Call destination is configured. App is not in battery-sleep mode. Problem: Unlock works in app but gate does not open Check: Use COM + NO for gate input. Relay duration set to 1 second. Gate input is correct. Test the gate by briefly shorting the gate input terminals manually. Do not inject voltage into dry contact input. Problem: Electric strike buzzes but does not unlock Check: Strike voltage matches power supply. Power supply has enough current. Strike is not under door pressure. Use NO/COM for fail-secure strike. Increase unlock time to 5 seconds. Problem: Maglock does not release Check: Use NC/COM. Relay is breaking power, not adding power. Exit button and emergency break glass are wired correctly. Power supply is correctly sized. 16. Simple wiring example for a gate DS-KV6124-WBE1 Relay 1 COM ---------------- Gate input COM NO ---------------- Gate input OPEN / PB / START Set relay time: 1 second This mimics a push button. 17. Simple wiring example for electric strike 12V DC Power Supply + | | Electric Strike + Electric Strike - | DS-KV6124 NO DS-KV6124 COM | 12V DC Power Supply - Set relay time: 3–5 seconds My recommended setup For most professional installs, I would do: PoE to the DS-KV6124-WBE1 Static IP address Hik-Connect enabled Indoor station optional Relay 1 for gate/door Relay 2 spare or second lock NVR recording added separately if required Use PoE wherever possible . Wi-Fi is handy, but for intercoms and gates, wired network is much more reliable. Permalink Comment on this FAQ Cancel reply Logged in as cedcommerce. Edit your profile . Log out? Required fields are marked * Comment * /* */ Δ /* */ Load More
incl. GST · Equipment supply
Price checked 6 September 2026Ask about this model at 12 Stelvio Close, Lynbrook VIC 3975. Monday–Friday, 9am–5pm; Saturday 9 am–1 pm; closed Sunday. Online ordering is being prepared. Confirm availability and collection arrangements with the showroom before travelling.
Collection information ↗Equipment supply does not include installation unless expressly included in your confirmed quote. Check compatibility with existing cameras, recorders and cabling before buying. Kit storage and additional equipment depend on the selected options.
Compare the listed model, lens and equipment options with the area you need to see. For an upgrade, have your current recorder model ready so compatibility can be checked. Equipment prices are separate from installation unless your quote says otherwise.
Model / SKU: HK-INT-GEN2-KIT1
Door station · Intercom kit · IP intercom
$535.00incl. GSTShowroom availability to be confirmedView product ↗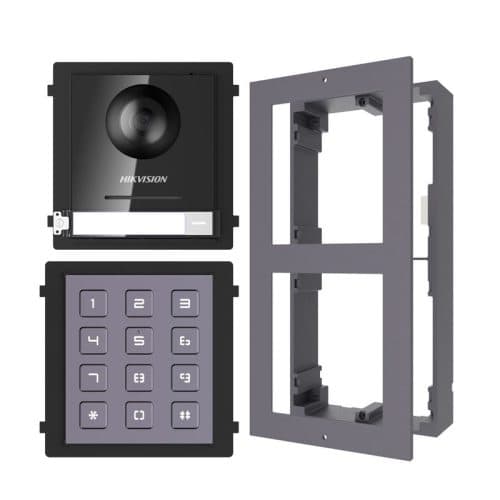
Model / SKU: HK-INT-GEN2-KIT2
Door station · Intercom kit · IP intercom
$418.00incl. GSTShowroom availability to be confirmedView product ↗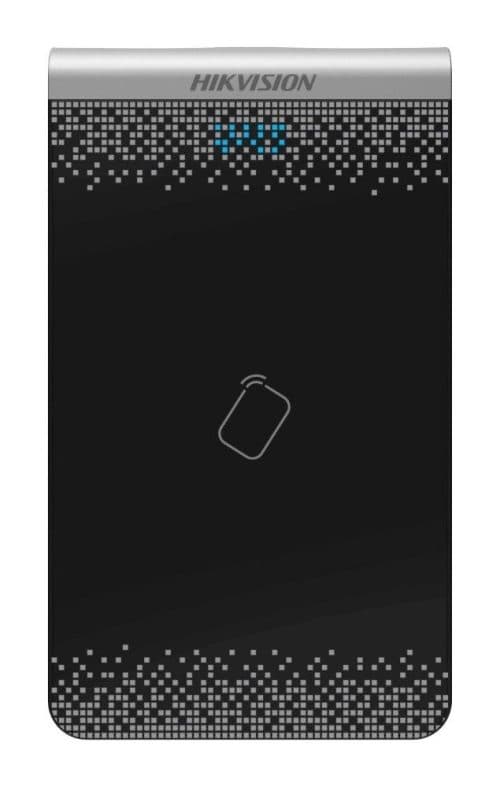
Model / SKU: DS-K1F100-D8E
Video intercom · Entry access control
$133.00incl. GSTShowroom availability to be confirmedView product ↗